How to survive cooking for one

Archive for August, 2011|Monthly archive page

Top 10 Freakishly Useful Kitchen Tools

In Equipment on August 25, 2011 at 5:01 pm

In the kitchen, there are things that are the necessitites.

And then there are things that are not necessary but are really fucking awesome.

This post is about the latter.

I’ve used most if not all of these, and I can tell you right now, these are all worth saving for, putting on your christmas list, or just going out and getting because some of them aren’t that expensive.

1. Chef’n Silicone Spatula – $10

This thing is awesome. It has two ends, both of which are silicone spatulas. I use them for making eggs, I use them for frosting cakes. Pretty much anything I need a spatula for, I grab this.

2. Silipat Silicone Pan-Liner – $12

It’s like that silicone spatula above, except it’s for your baking pan. Nothing will ever stick to it. Ever. Evereverever. I bake cookies on it, I bake pizza on it and then I slide the pizza off when I’m finished. Don’t need to flour it or anything.  I made peanut brittle once and it would have been a miserable endeavor without this. Anything you stick in your oven can go on this.

You can also use this for ghetto sous-vide. Just fold it and put it on the bottom of your pot and it’ll put an extra layer between your heat source and your food, help to keep the temperature even.

Just don’t ever cut anything on it. Use this instead:

3. NCAA Flexible Cutting Mat, pack of 2 – $8

These cutting boards are really useful. They take up less space than a solid cutting board and flexibility is always a plus, especially for getting what’s on your board to your pan (And not next to the pan, almost in the pan, on the floor, that crack between the oven and the counter where your food goes to fester for all eternity… etc.). They’re also very price fair and last for a good, long time.

4. Silicone Cupcake Cups – $10

I know you missed hearing about silicone. Don’t worry, I couldn’t let you down. As I’m sure you’ve gathered, Silicone is pretty much as beneficial for the kitchen as it is for the porn industry. I don’t know how we ever survived without it.

5. George Foreman Grill – $18

Because grilled cheeses were meant to be made on a goddamn grill, that’s why.

To be honest, this is another one of those things that you’re glad you have when  the situation calls for it. It makes like easier, and sometimes it’s just nicer to have your burgers grilled, instead of fried, and it’s nice to not need to add a shitton of fat for one grilled fried cheese.

6. KitchenAid Mixer – $100-$300

This is what I had in mind when I said “save up for” or “put on your christmas list”. As far as mixers go, these are the holy grail. Professional kitchens use them for tiny batches, and seeing as how you aren’t a professional kitchen, this is really all you could ever need. It mixes, it whips, it folds. Cakes, meringues, whipped creams, mousse … mmmm.

7. NorPro EZ-grip Granny Fork – $7

Somewhere between a spoon and a fork (but not anywhere int he spork family), pretty much infititely useful for stirring, stabbing, getting things from the pan to the plate, great for pasta. Julia Child admitted to loving it.

8. DIY Juice to Alcohol Kit – $10

This one is more fun than freakishly useful. I don’t really think I have to explain why.

9. Ball Wide-Mouth 1-pint Canning Jars, set of 12 – $18

Fuck canning, I use these for cups. Yep. I’m just that cheap.

And actually, I did later try canning, and it was pretty much the coolest thing ever. The cost of canning is actually comparable to the cost of buying canned goods. It’s really worth looking into.

10. Silicone Bowl Scraper – $7

Please stop scraping your cutting board with your knife. It’s killing your edge.

In fact, stop scraping anything with anything except this. This is the best for cleaning out a bowl of frosting or sauce and really getting that last bit. There’s seriously nothing more satisfying.

Nothing is as Classy as Shrimp with Feta.

In Cheap, Easy, Food, Healthy (ish) on August 23, 2011 at 4:12 pm

Let’s say you’re trying to put the moves on a lady-friend of yours. Possibly a neighbor of yours.

Let’s say you invited her over for some dinner, super casual, just a nice sit and chat. Maybe open a bottle of some wine that you got from a friend with a fake ID; probably cheap and terrible, but neither of you can tell the difference anyway.

Except you have no idea what to cook. Worse yet, you have the cooking skill of a shockingly independent five year-old.

No fear, I’m here to help.

I found this recipe on simplyrecipes, and it was delightful, but I felt there were some adjustments that could be made, so I made them. The version I’m giving you is specifically meant to be served over pasta. If you don’t want to serve it over pasta, or you want to try the original, go for it!

Here’s another tasty one-pan recipe.

Pasta with a Shrimp Tomato and Feta Sauce

You will need One Pot and One Pan.

First, take a look at your pan. Is it 10″? How big are the sides? You might have a chance of over-spill if your pan is too small. My pan was 10″ and it pretty much took it to the very rim of the pan.

If you’re worried it might be too small, don’t worry, just boil the pasta ahead of time and do it in your pot.

Ingredients (for a feast for two)

1 tablespoon of Oil (canola is fine, a light olive oil is great, too.)
1/2 onion, chopped.
2 cloves of garlic
2 cans of diced tomatoes
1/4 cup of chopped parsley (Take a big handful and chop it up)
1 lemon (optional)
3 oz of feta, or a full small package that’s close to that amount
1/2 to 1 pound of shrimp
Pasta of your choice
Loaf of french bread
Butter

Also optional:

1. Olives
2. Hot Sauce

Now with the shrimp, you can get it raw or cooked. Cooked is obviously easier, depending on your skill level you may choose to go with either. Raw shrimp often requires you to remove the shell at least. Removing the tail is optional, but if you don’t, you’ll be picking them out, later while you’re eating.

If you get your shrimp raw, you’ll also need to start preheating your oven to 425F, and make sure the pan you’re cooking in is oven-safe.

You can usually get shrimp frozen in your freezer section, raw or cooked, shelled or shells on, tails or no tails, but I’ve found that to be more expensive in the long run because I never end up using it all and it sits in my freezer until it’s freezer burned so bad that I throw away like 5 pounds of shrimp.

You can also get it raw or cooked (not to mention NOT frozen) in 1/2lb- 1lb portions in your grocery store at the seafood/meat counter for a few bucks.

0. Start boiling some pasta, or cook it ahead of time if you’re using your pot to cook this sauce.
1. If you’re using raw, turn on your oven to 425F.
2. Chop your onions and garlic. (You can sometimes find these pre-chopped in the salad section of your grocery. You can also buy pre-chopped garlic in a jar.)
3.  Get your pan to a medium-low heat. (Definite hiss when you flick water in it.)
4. Put a little oil in the pan (A tablespoon or so.)
5. Put your onion in, cook them until they’re transparent.
6. Put your garlic in, and cook it for about half a minute.
7. Put your cans of tomato and your shrimp in.
8.  Simmer it for about 10 minutes, to get the juices to thicken a little bit.
9.   If your shrimp is raw, go ahead and add the feta and parsley and and put it your preheated oven.
            9b. Use a dry towel to pull it out if you don’t have any oven mits.
            9c. Pull it out after 10-12 minutes, season with salt pepper and lemon juice (optional), serve over your boiled pasta.
10.  If your shrimp is cooked, cook it down for another 5 minutes, add in your parsley and your feta, cook it for another five minutes.
11. Add in about a tablespoon of butter, and then add little bits of salt (teaspoon at a time) until it tastes even better. Add some pepper if you like that. You can also squeeze a lemon in, I liked the effect of that.
12. Ladle your sauce over a bowl of pasta.
13. Serve with slices of french bread.

This dish is super classy, super tasty. Like I mentioned, as I was eating it I thought maybe a tablespoon or two of olive juice would actually make this even more amazing. Feta and olives? Match made in heaven.

Aaaaand because it was so delicious, I went ahead and made myself a second small bowl and wondered what the addition of a little Franks (hot sauce) would do to the taste.

Definitely will do again, if I’m in the mood.

The whole recipe I’m absolutely adding to my repertoire of dinner items.

How to Cut Shit Up

In Equipment, Food on August 18, 2011 at 4:09 pm

Cutting shit up is a pretty straight-forward thing, in terms of cooking, but I can remember it used to be kind of intimidating.

How do I cut shit up without cutting myself up? How do I butcher this piece of meat without butchering this piece of meat?

It turns out, there actually is a technique to do it right.

It all starts with your knife. A good one. With an edge on it.

Next, learn how to hold it. (How NOT to hold a knife.)

Note: please don’t actually try blind-folding yourself.

How to Cut Shit Up

1. Grab your hunk of meat! Hopefully, the hunk of meat you have grabbed, that you are preparing to cut up, is a cut of meat that is meant to be cut up. Some cuts of meat are better for braising in pieces, and some are better for roasting whole.

If your piece is boneless, it makes this a much easier (albeit not as delicious) task.

What you want to do, if you meat has bone in it, is:

2. Remove as much meat from the bone as you can. Follow the bone with your knife, keeping the blade as parallel as you can. Follow the natural seams of the meat, and try to keep your cuts clean by never using a sawing motion. Utilizise the tip of your blade. Make sure you’re keeping track of where your fingers are, and never cut towards yourself.

What you’re left with is probably a hideously mangled collective piece of meat. That’s okay, you’ll get better with time.

3. Feel around for bone fragments and other gross, hard things you don’t want in your mouth, breaking your teeth or stuck in your throat.

5. Next, what you want to do is take a hunk of meat, and slap it down on your board.  If this hunk of meat was removed from bone, you can probably treat it like a plank. If it’s the whole piece of meat, trim away the fat, and then take your knife and cut it into planks.

6. Take a plank and lay it out on your board.
7. Cut it into strips that are as wide as the plank is thick.
8. Go back again and take the strips, and cut across them so they become somewhat uniformly sized chunks.

If these words don’t really make much sense to you, maybe this gif will help you understand the basic idea.

You can vary how thick your cuts are to make a smaller or larger dice, as needed. Please note that you would not normally cut up a beautiful roast like that into chunks.

Do you need more specific instruction than that? How to quarter a duck, for example? How to dice an onion? How to mince garlic? How to cut up a potato?

Well, I can describe those in other blogs. For now, though, this should hopefully present a basic idea behind the priciple of cutting shit up.

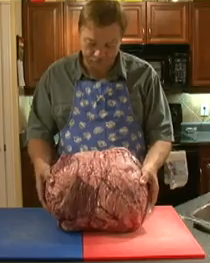
If you’re still a little nervous, here’s a picture of a happy-looking Danish fellow cutting up a massive piece of Costco meat.

Holy crap.

Don’t be a ‘tater hater.

In Cheap, Easy, Food, Healthy (ish) on August 17, 2011 at 3:57 pm

Potatoes are pretty awesome. Growing up, I can’t imagine any single food I’ve ever eaten as much of as the potato.

Thinking back, this is probably because at any moment my mother could look in the dark, cool place we store the potatoes and think of seven different ways to cook them.

Really, there are a lot of different things you can do with potatoes. Not all of them productive. Or logical.

But I’m really only going to focus on one, right now. Mashing.

Deciding on what kind of potato you’re going to use for dinner is kind of important. There are a lot of different types of potatoes, but the main two categories are:

Waxy potatoes vs. Mealy potatoes

Mealy potatoes have a higher starch content. Waxy potatos have less starch, but more pectin.

You might think, “What’s the difference? A potato is a potato!”

And you’re mostly right. However, some potatoes are just better for some methods. If you’re going to boil or stew them, use a waxy potato.  If you’re going to deep fry or bake them, use a mealy potato.

Waxy potatoes hold together better, this is because of the pectin. They also have a creamier texture. Mealy potatoes are often described as … fluffier, which is good for baking and other dry heat methods, but they are more prone to fall apart when in contact of water.

I’m not saying that no one ever boils a russet potato. Your pot will not implode if you try.

But if you’re going to mash some potatoes, try buying some yukon golds, instead of the same old russets. You might like them more.

Waxy Potatoes

Red Potatoes
White Potatoes
Any “new” potato (which is basically a baby potato. These are always lower in starch.)

Mealy Potatoes

Russets
(Finding a list of mealy potatoes was actually hard for me. At first I couldn’t really understand why, but a little digging brought me to realize that Russet (Idaho) potatoes are such a huge industry that it doesn’t really need any competition. If you’re looking for a high-starch, mealy potato, you’re probably going to buy a russet.)

Potatoes that are kind of in-between (All-Purpose)

Yukon Gold
Purple / Blue
Fingerlings

How to Mash Potatoes

1. Buy some potatoes. My favorite potatoes to mash are yukon golds.
2. Peel them.
3.Cut them into uniform pieces, 1″-2″ thick.
4.Get a pot of cold water, add maybe a tablespoon or two of salt to the water
5. Crank the heat up to a medium temperature.
6. Stick a lid on it.
7. Come back to it in 10 minutes, stab them with a fork or a knife or a skewer. If it goes in to the center of the potato easily, they’re done. This might take another 5-10 minutes.
8. Turn off the heat, drain all of the water out of the pot. If you don’t have a colander, put a big enough plate over the front of your pot and be very, very careful of burning your fingers as you tilt your pot forward into the sink. Watch your face when you pour the hot water out. There will be a lot of steam.
9. Mash them! Use a masher if you have one, a whisk or a fork if you don’t. If you happen to have one of those fantastic cheap hand-mixers, ($10 new, $5 GoodWill) break it out and use that. Be careful not to abuse them too much, just enough to mash them. If you work them too hard, you will have glue that tastes like potato.
10. Season them. There are a lot of different ways to season your mash, and it all boils down (HA!) to personal preference. In my family it was always a blend of sour cream, butter, mayonaise, salt, pepper and sometimes garlic (if I begged long enough). If you like it simple, just add some butter, and then keep adding salt until it tastes amazing.

When seasoning anything with salt, it’s important to remember that you aren’t aiming to make it salty. Salt isn’t supposed to make food salty, salt activates the enzymes on your tongue. It’s basically a magnifying glass for all of the flavors in your food. Before I started culinary school, salt was just sodium, that thing that people consume too much of. After I started culinary school, salt became a mantra.

Well, not really. Mostly it was just, “Needs more salt.” that I kept hearing all the time, until I really felt out the fine line between “perfectly seasoned” and “salty”. Then whenever the new students put out their extra potatoes in the lounge for the starving management students to eat, I found myself saying it a few times, too.

Microwaveable Magic: Mug Brownies

In Cheap, Easy, Food on August 15, 2011 at 3:16 pm

You’ve got a microwave? You’ve got five minutes?

Time for some brownies.

I’ve seen a few variations of this floating around on the internet, and I’ve tried messing around with them. Some people complain that it’s a little cake-y for the main variation I’ve seen. If you Google search “mug brownies”, you’ll see it come up a few times. I actually tried making it, and it was terrible. At first I thought that was because I’d been messing around with the recipe, so I tried making just the original version. It was equally terrible. I was eating it with some ice cream, which we thought made it taste better, and then after about a few seconds of that we abandoned the brownie and just ate the ice cream.

So after some digging and a bit more tinkering, I found this recipe:

2 tablespoons of water
2 tablespoons of oil
Pinch of salt
Few drops of vanilla extract
2 tablespoons of cocoa powder
A pinch of instant coffee (if you like coffee)
3 tablespoons of sugar
2 tablespoons all purpose flour

1. Mix all the wet together in the mug (Don’t have a whisk? Use a fork!)
2. Add in the dries, one dry at a time. Mix after each one so that it doesn’t get too lumpy.
3. Microwave for a minute (give or take 30 seconds depending on how strong your microwave is. Use your best judgement.) If you want it molten on the bottom, one minute. If you want it uniformly cooked through, try about 75 seconds.

Great with ice cream.

Then again, ice cream is also pretty great on its own.

Go forth and create brownies, my friends.

Chile Verde: Green and Tasty

In Cheap, Easy, Food on August 11, 2011 at 8:38 am

Chile Verde is a New Mexican favorite, famed for being easy, delicious and hearty.

I came across the recipe sitting down to eat with a family of outdoors-y types. It makes great camp food, apparently. It’s so easy to make, requires few ingredients and is all around delicious, and doesn’t even need to be seasoned.

The ingredient list is as follows:

  • Half an onion
  • a few cloves of garlic (If it’s fresh, use less; if it’s not, use more.)
  • one 7 or 8oz can of diced green chiles
  • one 16oz can/jar of salsa verde
  • A big hunk of pork shoulder, somewhere in the 3-5lb range.

The best salsas to use for this are the ones that have serano chiles in them. They have the best flavor. If you like heat, you can buy some canned jalapenos and add a tablespoon or so of those, as well. This is actually great for serving to people with a lot of levels of tolerance.

As it is, this is not a spicy dish at all. Even the biggest of wimps and wussies should be able to handle this.

That the cut of meat be pork shoulder is absolutely crucial: Pork shoulder, ordinarily is a pretty shitty cut of meat. It’s really tough to roast, so what you want to do with it is braise it until it simply falls apart. It’s also pretty cheap, at about $2 a pound (on the pricier end). Other cuts of meat simply won’t braise as well. Boneless cuts are generally harder to find but are easier to cut. Bone-in cuts offer more tender meat and all-around more flavor.

How to make Chile Verde:
4. Get your pot up to a medium heat
5. Put in about a tablespoon of oil
6. Put in your onions, give them a stir and let them cook for a minute. If your heat is too high and they start to get too much color too fast, on’t worry about it, just add the salsa and scrape the bottom of the pot to stop it from burning.
7. Put  in your garlic
8. Wash your cutting board
9. Add in your salsa verde, canned diced chiles and meat.
10. Turn the heat down low. I mean it. Not medium low. Low.
11. Put a lid on the pot
12. Set a timer for 30 minutes
13. When the timer goes off, scrape the bottom of the pot to make sure it isn’t sticking to the bottom of the p0t.
14. Repeat steps 12 and 13 for another hour.
15. Remove the lid from the pot.
16. Repeat steps 12 and 13 for an hour and a half.
17. Serve
18. Stick the leftovers in the fridge.
19. Eat the leftovers for lunch.

20. Repeat step 19 every day until there isn’t any more.

Pretty easy, right? At first, it might seem like there’s a whole lot of meat and not enough salsa, but after about 30 minutes in, with the lid on the pot, you should see the water rendering out of the meat, and you might worry that there’s too much liquid in the pot.

That’s why you remove the lid, so the water can evaporate out.  That’s actually called “reducing” in culinary terms. Once you find about the whole thing is reduced by about half (meaning there’s about half as much liquid in the pot as there was when you took the lid off), you’re finished.

If you’ve never cut up a hunk of meat before, here’s how you do it:

How to cut up a hunk of meat:
1. try to remove as  much meat from the bone as possible. (Don’t get too overboard with this, it goes in the pot too, and anything that’s hard to get off will practically fall right off later.)
2. Take what you’ve removed and feel for bone fragments and other hard things that you don’t want to end up in your mouth.

3. Take a chunk of meat and cut it into 1-2 inch strips.
4. Line up the strips and cut across those at 1-2 inch intervals to make square(ish) chunks.

Putting the bone in the pot will increase the flavor of the chile and make it easier to get all the meat you paid for out of the package and into your belly. Plus, all the meat closest to the bone is the most tender. You don’t want  to miss out on that, do you?

This is kind of like a hearty stew, when it’s finished. I tend to eat it on its own with bread, but you could also eat it with rice or anything else that goes really well with salsa and meat.

The Good, the Bad, and the Eggly of Egg Cookery

In Cheap, Easy, Food, Healthy (ish) on August 10, 2011 at 1:18 pm

I really used to not like eggs that much, definitely, before I started culinary school.

Okay, that’s not true. I hated them.

So it turns out, there’s an entire week of culinary school dedicated to egg cookery. Frying, scrambling, poaching, omelet-ing, the works.

And after about a week of that, you start to learn that maybe there is something to eggs.

I mean, other than being pretty much the cheapest thing in the grocery store after milk and salt, they happen to be really easy to cook. And they actually taste pretty good, too. And you know, they’re not a bad source of protein. And at only 100 calories an egg, definitely easy to see why everyone’s eating eggs for breakfast.

We begin with Scrambling!

1. Take your eggs, crack them into a bowl. (Two is perfect for one person, with toast. Three without toast.)
2. Use a fork to break the yolks and mix them together with the whites.
3.  Add a little bit of salt and pepper.
4. Get your pan to a medium-high heat (when you flick water at it, there’s definite hiss).
5. Get your oil in the pan. (Just enough to coat the bottom, if using stainless. Tablespoon of oil if using teflon.)
6. Get your egg in the pan.
7. Let it sit for a second, until you can barely see the color change around the edges.
8. Start pushing the egg around with your spatula.
9. When they don’t look shiny, they’re done. Stick ’em in a plate, add ketchup, whatever. (The method for doing this in a teflon pan is similar, just use a rubber spatula and keep the heat a little lower.)

It’s important that when you’re doing this in a stainless pan, your pan is hot enough.

Frying eggs!

1. Get your pan to a low-medium heat.
2. Add oil. EASY MODE: Teflon GOD MODE: Stainless (Easily 2-3x the oil)
3. Crack  your egg into it.
4. As soon as you start to see the white forming solid along the bottom, get your spatula underneath to loosen it up, making sure that it doesn’t stick to the bottom of the pan (If using stainless, this is a lot harder than it sounds.)
5. Once all the white is set up with the yolk still runny, slide the egg in the pan around so the yolk is as close to the handle as can be.
6. Slide it to the opposite end of the pan from the handle
7. Flip!
8. After about 15 seconds, it’s done over-easy. 30 seconds: medium. 1-2 minutes: well done

You want it to look like that within a few seconds of adding the egg to the pan. If it’s cooking much faster than that, your pan is too hot.

This is why you should consider getting a teflon pan:

To contrast how beautifully easily that was, moving around in the pan, this is the same thing in a stainless pan:

Still delicious, just not as pretty.

In addition to being cheap, healthy, easy and fast to make, is there really anything more satisfying than asking someone how they like their eggs in the morning and then actually being able to give it to them?

One last thing, on the subject of how great eggs are:

You can keep eggs in your fridge for about eight weeks. You can leave them on the counter for a solid week, and they’ll still be safe to eat.

It’s always the little things that bite you in the ass, later.

In Equipment on August 8, 2011 at 3:50 pm

There are a ton of little things that you take for granted that you’ll probably forget about until you realize you need one later, probably around the time you go to flip something and realize you don’t have a spatula. Or you want to eat your soup and realize you only have plates. (I might be speaking from experience, here.)

All these little things can really add up, though, and because of that, you should really check out your nearest GoodWill or whatever.

What you’re looking for:

A butterknife, a spoon, maybe even a fork. You can pay $20-$80 for a box set, or you can do what I do and go to GoodWill and get ’em for a quarter a piece.

A mixing utensil long enough that you can scrape the bottom of your pot with. You can’t go wrong with a wooden spoon. Unless you’ve got some teflon, in which case, I actually recommend something made out of high-temp rubber or silicon. Silicon is pretty much the most amazing thing you can find in a kitchen since sliced bread. Seriously.

When looking at getting a cutting board, the goal is ANYTHING NOT MADE OF GLASS. Plastic, bamboo, wood, whatever. Plastic is what they use professionally. I’ve got some bamboo, personally.

I mentioned these in the first initial blog, but I’ll bring them up again just to remind you:

Potato peeler
Spatula (Kind of important.)
Can opener (This one really shouldn’t be optional, to be honest. You’re going to be opening a lot of cans.)
Bake sheet (if there isn’t already one in the oven I sure hope you have.)
Plates (Sure, napkins served me well for the first month and a half, but after a while, you start to want more.)
Bowls (You can’t eat soup out of a napkin. You can’t. It doesn’t work, believe me, I tried.)
Microwave

Let me tell you a bit about microwaves:

The actual microwave component, the thing that does the microwaving, every single one of them is made by the same people. The casing and design, however, those are all different and unique in a number of special ways. What you’ll find, when you read reviews for microwaves, is that there’s always one person saying “Worked fine and then quit on me six months in.”  And believe me, that’s pretty much every microwave I’ve ever researched. However, not all microwaves are created equal. Some have rotating plates, for example. Some are bigger, some are smaller, some are red, some are blue, some just suck. My only advice is to find one that doesn’t suck, and if it doesn’t crap out six months in, keep it forever. You can generally find a decent, reliable-enough microwave for $50.

How to not horribly maim yourself.

In Equipment on August 8, 2011 at 3:50 pm

When choosing your knife, the most important thing to remember is that sharper is better, the worst cuts are the ones made by shitty, dull knives.

I want to tell you to sharpen it every day, before you use it, but I know you won’t.

All I can say is get a knife you feel comfortable using. There are a lot of different types, carbon steel, stainless steel, ceramic, and each has its pros and cons.

Types of Knives:
Stainless:

+Takes forever to dull
+Will never rust
-Takes a bit to get an edge on it

Carbon steel:

-Will dull in a second, need to know how to sharpen it
-Will rust if you don’t take care of it and make sure to keep it dry after washing it.
+Can get hella sharp

Ceramic:

+Can get pretty sharp
-Can be difficult to sharpen
-Can break if you drop it

I actually recommend a Stainless Carbon Steel blade. (Yeah, I know. They have those.)

Stainless Carbon Steel:

+Can get pretty sharp
+Doesn’t dull as fast as carbon steel does
+Takes a bit to make rust

You want a heavier knife, one that will work with you, instead of you working it. Also, learn how to hold it. HARD MODE: learn how to use THE CLAW. GOD MODE: become a foodie.

I don’t want to preach too much on the topic of cost, but hardcore chefs and foodies will tell you you absolutely need to drop $[too much] on a knife, and learn how to upkeep it.

I am completely inclined to agree with them, just on the principle on safety: as crazy as it sounds, a sharper knife is much, much safer than a dull one. A dull knife means you use more force when cutting something, and that means one slip and all that force is put onto your fragile, fleshy fingers.

Still, I know you’re on a budget. When you’re looking for a knife, try to avoid box sets. ESPECIALLY avoid a box set with some 30 pieces or whathaveyou. Or, if you’re getting them just for all the pieces (the spatula, potato peeler, mixing spoon, crappy steak knives, all included), fine, but go out of your way to buy a single, decent knife later. Safe tier: $30 Decent tier: $40 God tier: $60+ Pro Teir: $100+

A few good knives:

J.A. Henckels -$48
Wusthof – $59
Pfaltzgraff – Sabatier  – $10

That last one is not a typo.

Please, never ever put your knives in a dishwasher. You might even want to learn how to sharpen them.

What kind of pan do I want?

In Equipment on August 8, 2011 at 3:49 pm

There are a number of options here, but what you really want to consider is teflon vs stainless.

           Stainless

Can handle abuse
Can handle higher heat
Need more oil to cook with
Can be a bitch to clean if you let stuff sit
Needs more attention
Lasts longer
Good for some most things

                Teflon

Will chip if you blow on it
Dear god please do not put this on high heat
Nonstick, Nonstick, Nonstick
Chips easily — replace more often
Good for most some things

The decision to choose one or the other comes down to what you will be cooking. THings are going to be harder to cook in a stainless pan. That’s just how it is. Nothing sucks more than trying to saute something, and it just keeps sticking to the bottom no matter how much oil you add. If you can only get one, I would recommend getting the stainless which can do everything, rather than the teflon which can do a lot of things, most of which are easier than the stainless, but actually can’t do everything.

If you get a teflon pan, make sure you use a gentle object like a rubber spatula to scrape it with.

You want something with a thick bottom to distribute heat evenly, prevent warping, and prevent your food from getting scorched. If you’re looking for this at Wal-Mart, my friend, you are in the wrong place. Never seen a Wal-Mart pan that didn’t warp.

The size of your pan is also pretty crucial. You want a decent size, something that’s easy to handle and is more versatile. For that, I recommend a 10″ pan, maybe an 8″.

BONUS MODE: Small Teflon egg pan. I know, I know, ONE POT ONE PAN, but if you’re going to go above and beyond, get one. It’ll make life easier … but that’s another blog. I actually got a great little egg pan from GoodWill for $4.